
Last week I did a tutorial on making your own WordPress shortcodes. This week I wanted to show you how to split off your shortcodes into their own plugin so you can easily move them. Creating a WordPress plugin is extremely easy and is especially useful if you work on multiple sites. That way you can easily install your plugin on every site you are working on and have access to the same shortcodes.
This tutorial is split into two parts. First there is the theory behind WordPress plugins. Second is the actual practical application of making a very simple WordPress plugin. If you read the theory section and then go through making the very basic plugin, you should be able to branch out and do more complex plugins. If you just want to get a very basic understanding or are in a rush, you can definitely just make the simple plugin and learn a bunch from that.
Theory
WordPress plugins work by using Hooks, Actions and Filters in order to add functionality to your site. Below is a quick summary of each. Note that this tutorial will only give a basic understand of each of them, but will not go in-depth into how to use them when writing a plugin. The plugin outlined further down is meant to be very simple and only uses shortcodes which I have covered before. In a future tutorial I will get into more advanced plugin development.
Hooks are functions provided by WordPress that allow you to add functionality to a particular part of WordPress. Note that both Actions and Filters are types of hooks.
Actions are triggered by specific events, such as loading the admin menu. You can then register a function with that action so that the function is run every time the action takes place. Actions usually do something – such as modify the database, send an email, or modify the generated page. Actions are made up of a function that is hooked to an event using the add_action function. Below is an example of an action hook:
This action will add the dobson_admin_menu function to the admin_menu action. This example would be used to create a administration menu for your plugin assuming the function dobson_admin_menu has the proper code.
Filters are functions that WordPress passes data through before performing an action. You can think of filters as a layer of code that surrounds the database. Everything that comes out of the database and to the page goes through a filter, and everything that goes through a page to the database also goes through a filter. Filters are made by creating a function that will modify data and then return it by hooking it to WordPress using the add_filter function. Filter functions should always take in raw data and return modified data. Below is an example of a Filter function that replaces undercover agents names:
You can then hook in this function to the comments section by using the following:
Again, in the practical example we are about to look at, we do not use much of this theory section. The theory will come in more in the advanced lesson when we start using the database and making administration menus.
Create a Simple First Plugin
The plugin we will create is based on my DobsonDev Shortcodes plugin that I recently made. This plugin was actually made based on my shortcodes tutorial, I just added more shortcodes and moved to a plugin. The plugin adds a bunch of useful shortcodes for embedding different things into your site’s pages. The only hook this plugin will make use of is the add_shortcode hook.
Our simple WordPress plugin will be made up of the following three elements.
 First, a folder that contains all the plugin files. The folder should be named the same as your plugin. For example, I named my plugin “DobsonDev Shortcodes” so the folder name is “dobsondev-shortcodes”. This folder will contain all the files for your plugin.
 Second, a PHP file that has the same name as your folder. In my case this was “dobsondev-shortcodes.php”. This file is all that is required to make the plugin function. In order for the plugin to function, you do not even have to put this file in a folder, but since most plugins are more than one file its best to just make the folder for good practice.
 Third, you should have a “readme.txt” file. Please note that the readme.txt file is NOT required, but if you want to get your plugin on the official WordPress plugin repository then it is required. This file will contain all the useful information that the users will need to know about your plugin.
To start make a folder on your computer somewhere for the plugin. Name it whatever you want to name your plugin, but it should probably be descriptive.
Next make your PHP file in the folder you just made and name it the same thing. If you named your folder “my-shortcodes” because you want to call your plugin “My Shortcodes”, then name the PHP file “my-shortcodes.php”.
Open up the file and get your PHP tags down. The first thing we will add to the file is comments which contain the information regarding your plugin. Below you can see the information taken from my plugin:
You can fill in your own information for the Plugin Name, Plugin URI, Description, Version, Author, and Author URI. I would highly recommend you keep your license as GLPv2 and use the same copyright notice at the bottom. The GLPv2 is also the license recommended by WordPress.
Once you have the information laid out in the comments at the top of the file, you can fill in your code. My plugin has a collection of 5 shortcodes. The one outlined in my shortcode tutorial is for embedding GitHub gists and the code is as follows:
As you can see, we have the dobson_create_github_gist function that is hooked to WordPress using the add_shortcode hook. This is your example for how the theory to is tied practical application. You create a function that adds something, then use a hook to add it to WordPress. Even larger and more complex plugins use this same basic process.
One very important thing to note is that all of your functions should be named in such a way that no other plugin will use the same name. It is common to preface all functions with your initials or last name. This can be seen in the example above. This way, if anyone else made a plugin that embeds a Gist, we will have not have the same function names and therefore no errors will occur. Please keep this in mind when developing your own plugins.
Add this code and whatever other shortcodes you want to your main PHP file. Remember to be sure to name your functions uniquely so that no errors will occur! Once you have all the code you want can save the file and close it.
Your plugin should now be able to function. If you copy your folder into your plugins directory on your site, then you should be able to activate it and use your shortcode. However, if you want to make it in the WordPress plugin official repository then you will need to add a readme.txt file – plus its good practice to include a readme.txt file so its best to start now.
The readme.txt file contains all the information that will display on your plugin’s official page. Below is a copy of my readme.txt file for my plugin:
If you now look at my plugin’s official WordPress page, you can see the readme information translates to the information that is displayed on the page. This is very important since the users will be using this information to determine if they want your plugin or not.
If you are ever confused or unsure of what to put in your readme, you can always view the WordPress template readme file. This template and my own readme will help you get a good idea of what should be included and how the markdown works for WordPress.
The start of the readme begins with === PLUGIN TITLE === followed by information regarding your plugin. If you want to put your plugin up on the repository its important that your “Stable tag” in the readme.txt is the same as your “Version” in your main PHP file.
The small sentence that says “Add a collection of helpful shortcodes to your site.” in my example is the very brief description that will appear at the top of the plugin page. You can see how it is displayed below:

Next you will include the different sections of your readme file. It is very important to include information for the headings Description, Installation, FAQ, and Changelog. These are the most read by users and should always be filled out. You can use my example as a template, but you are definitely free to write whatever you want.
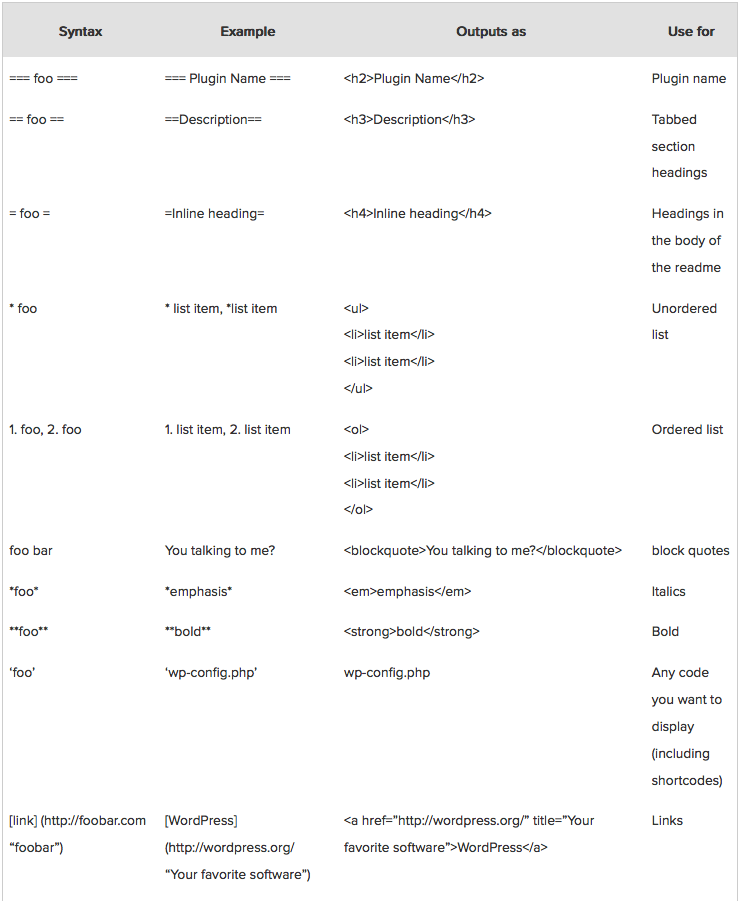
The WordPress readme.txt file uses a specific kind of mark down. Below is a summary of the kinds of things you can do so that you can fill up the different sections of your readme the way you want to (courtesy of Smashing Magazine):
The rest of the information is pretty much whatever you want to put to describe your plugin. If you want to check your readme.txt file you can validate it using the WordPress Validator.
That’s pretty much all there is to making your first basic WordPress plugin. If you want to read more about the hooks right now and learn more about plugins, please check out the Codex entry on Plugins. It branches out and you should be able to find everything you need to know.
If you have any shortcodes that you want added to my plugin, please let me know in the comments below or email me at alex@dobsondev.com. I am always looking for more shortcodes to add and I hope my plugin can become and good collection of useful shortcodes that anyone can use.
As always thank you for reading and please share it around as much as you can! Please feel free to put any questions, suggestions, or ideas in the comments section below. I would really like to know what kind of tutorials everyone wants me to make.