![]()
jQuery is a fast, small, and feature-rich JavaScript library. It makes things like HTML document traversal and manipulation, event handling, animation, and Ajax much simpler with an easy-to-use API that works across a multitude of browsers. With a combination of versatility and extensibility, jQuery has changed the way that millions of people write JavaScript. – jQuery.com
jQuery is easily one of the most popular libraries available on the web. According to recent research by W3Techs, jQuery is now used on half of all websites worldwide (via SitePoint). It allows you to actively change content based on users interactions with your site, resulting in a much more interactive experience. jQuery also makes it super easy to find elements in the DOM (more on this later), change HTML content, listen for user interaction, animate content on the page, and talk over the network in order to get new content for the page.
In order to get through this tutorial you should probably know your way around at least a little HTML, CSS and JavaScript. If you aren’t an expert front-end developer that’s fine, but some general knowledge should be there. You should also read my Basic jQuery Tutorial Part I as well as Basic jQuery Tutorial Part II before going into this tutorial.
Event Handling
This tutorial will start off with a look at some different event handling. To start, please change your jQuery-Tutorial.html file so that it contains the following information:
Once you have your HTML file all setup, its time to take a look at your JavaScript file. In jQuery, events are given a function that performs when the event is triggered. We have actually been using an event handler for a while now:
This is actually an event handler function. When the DOM is loaded, this function triggers and its code is run. Of course we could use an actual function rather than wrapping the function as we have been doing. For example, we could do something like this:
This code will function the exact same as what we have been using so far. Please note the lack of parentheses in the function when its called. The proper way to call it is jQuery(document).ready(ready) rather than jQuery(document).ready(ready()) which is not correct.
.on()
In order to “watch” or “listen” for events, we use the .on() method (API page). The .on() method has the follow syntax: .on( events [, selector ] [, data ], handler(eventObject) )
As the above syntax indicates, the only required elements are the event and the event handler function, so we will focus on those for now so you can get started. The event is the event we are listening for. The event could be ‘click’, ‘focusin’, ‘mouseover’, ‘submit’ and many many others. For a full list of events, please see the jQuery Events API page.
After you’ve chosen the event you want to use, you simply need to have the function you want to run when the event takes place. Note that this function can either be embedded or it can be a separate function (as mentioned above). The following examples will give a better understanding of how everything works, so without further ado… lets do some examples!
Click Event
Let’s take a look at our first type of event, the click event. Add the following to your jQuery-Tutorial.js:
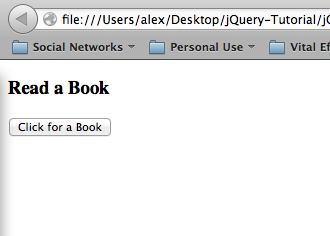
This code will watch for a click event on the <button> element in our HTML file. When that happens, it will run the embedded function. This function If you are getting confused by the .after() method please read my jQuery Basic Tutorial Part II, which covers adding to the DOM. The output when you first load the page will look like this:
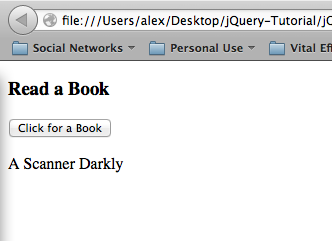
After you click the button however, jQuery will put ‘<p>A Scanner Darkly</p>’ after the button. This output looks like this:
All events work in the same fashion as this. Once you have learned one event, you will be able to perform any other event. That being the case, after you learn to use the .on() method with the click event, you should be able to learn the rest on your own. To learn about each of the events check out the jQuery Events API page. That page will have everything you ever wanted to know.
There is also an alternative way to call events. Rather than using the .on() method, most events have their own functions. These functions are simply shortcuts for the .0n() method. Let’s take a look at the .click() method as an example. We can change our code in the above example to be:
This will function in the exact same way as .on(‘click’, function(){}), it is just another way to write it that some of you may want to use.
On With a Selector
If you want to target an event but only want it to be targeted if its within a certain class or id, jQuery’s .on() method provides that function. If we take our above example, we can modify it so that it is only triggered when within the class “.activity”. We simply change our code from our above example to:
As you can see, the selector is now the class rather than the button because we have moved the button inside the .on() method. This reads in the activity class, on a click of a button, run this function. Now if you run your code you will notice that nothing happens. This is because the button is not in the activity class. If you add a <div class=”activity”> surrounding the button though, then the code will function just as before.
On with selectors are also very useful as filters. If you have a class of items called “on-sale”, you can use .on(‘click’, ‘.on-sale’, function(){…}) to run your function for only the on sale items. This is very useful in many real world applications.
While on with selectors are one way to filter, you can also use jQuery’s built in .filter() method. This method reduces your selected elements to those that match the selector or pass the function’s test. A common example is adding some color to a list to making it easier to read. You can use $(‘li’).filter(‘:even’).css(‘background-color’, ‘red’) to make the background of ever even element of the list red. I know we haven’t gone over the jQuery .css() method yet and that this was a very short introduction to filters, but I will cover both much more in depth in the next tutorial.
$(this) Selector
Event handlers are always given an object upon which they act. In the above example, you passed the event handler the “button” class of objects. When the button is clicked, you can reference it inside the function as “this”. The “this” object is an object-oriented concept that refers to the object on which the function is a method for. You can think of the “this” as the owner of the function, because that function works for its owner. In the case of an event handler, “this” refers to the element on which the event happened. Let’s take a look at an example to make it more clear.
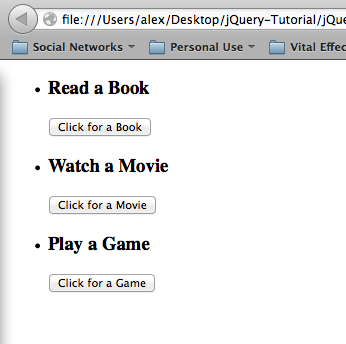
First, lets add some more buttons to our jQuery-Tutorial.html file. We are going to expand our things to do by adding the following (feel free to copy paste, the JavaScript is more important than the HTML):
HTML 5 Data Attributes
Some of you may have never seen the HTML 5 data attribute that is used in the above example, so I think I should just give a quick run down of what it is. Simply, the specification for HTML 5 data attributes says that any attribute that starts with “data-” will be treated as a storage area for private data (private in the sense that the end user can’t see it – it doesn’t affect layout or presentation). With data attributes, you can write valid HTML markup while, embedding data within your page.
Normally I would just use a database to store my data (this will be show in a future tutorial about using jQuery for AJAX), but data attributes are the simplest way to express this example.
You can select data attributes with the .data() jQuery method. Remember that the data attributes name is denoted by the string after “data-” in the HTML code. So to grab “data-value” from our example, you would use:
This will display the first data-value attribute, “Fantastic Mr. Fox” in an alert window. Now that you understand how HTML 5 data attribute works we can continue our example.
$(this) With Event Handling
In our example, we want to be able to click a button and then display the data-value for that activity. If we were to use the code similar to this example from above:
Then after every button it would display the same thing. This is not what we want though. For the book button, we want it to display the book, but only under the book button. In order to achieve this we have to use “this”. By using the “this” keyword, we will ensure that we only select the button that was chosen. In this way, we can use $(this).after(…); to display our information after the button that was click – and only that button. Note that you CANNOT just use “this”, but first must turn it into a jQuery object in order to properly use it. Always surround “this” by “$()”.
We have figured out how to display our information after the button that is clicked, but we still have to retrieve the data-value that corresponds to the clicked button. Again we must use the “this” keyword. We will also use a new method of traversal, closest(), in order to find the data-value. The closest() method gets the first element that matches the selector by testing the element itself and traversing up through its ancestors in the DOM. If we use $(this).closest(‘.activity’) then we will find the parent <li> of the button we pressed. This <li> contains the data-value, so we can then select it using .data(‘value’). When combined, we will have our working jQuery-Tutorial.js file as seen below:
Before any buttons are pressed our page looks like:
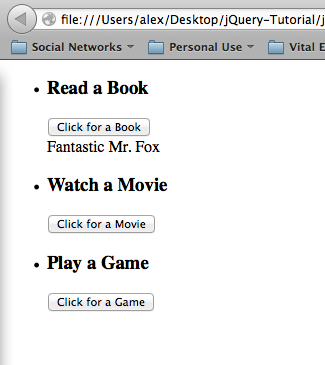
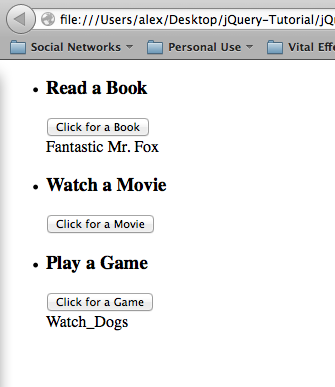
But after we click the “Click for a Book” button we get:
Then if we click the “Click for a Game” button we will get:
Finally, when we click “Click for a Movie” our page looks like:
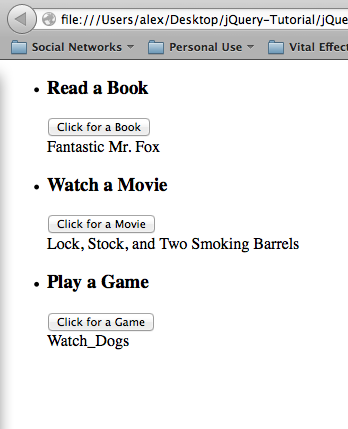
As you can see from the results, everything worked exactly how we expected. The $(this) selector is very powerful in this way because it allows you to write code that will function on many different elements in the DOM, but only make changes to the element that the event occured to. Imagine if you had a page full of products and on a “mouseover” event you wanted the prices to display. Using the $(this) selector you can write your code once for all of the products.
.parent()
The .parent() is similar to the .closest() method but instead just walks up the DOM and finds the parent of the element. In our example, the <li> with the data-attribute is the parent element of the button. Since this is the case, we can change our code to:
This code will function in the exact same way as our previous code. However it is not always the case the the element will be the first parent. If you want, you can chain together parents to walk up the DOM, but this is not recommended. Most people find .closest() code much easier to read than .parent() code since you can search for the class or id that is given in the .closest() method. I recommend using closest wherever you can rather than parent for this reason. It will make debugging a lot easier later and programmers who come after you will thank you.
That’s all I wanted to talk about in this tutorial. In Part IV of my Basic jQuery Tutorial we will learn all about modifying CSS, do more work with different event handlers (including keyboard events), and do some basic jQuery animations. Part IV will probably be the last part in the tutorial series unless I can think of anything else I want to cover.
As always thank you for reading and please share it around as much as you can! Please feel free to put any questions, suggestions, or ideas in the comments section below. I would really like to know what kind of tutorials everyone wants me to make.