
In last week’s tutorial, we Added a Widget Area to our WordPress site. For this tutorial, we will be looking at creating your own custom widget to put into that area. Creating a widget is similar to creating a plugin, but it is a bit more simple in most cases.
For our example widget, we will make a widget that will display the name, title and website of possible collaborators. It’s honestly not the most useful widget, but it’s very simple to understand so its good for this tutorial. I will be calling the widget. You can couple the widget with the Display Widgets Plugin in order to make it a little more functional. This would allow you to put different collaborators on each project page so they don’t display on every page. This is not the best way to make something like this, but it would make the widget more functional.
To start off this tutorial, we are going to look at a rundown of the 3 basic functions used for all WordPress widgets.
Main Functions
A widget is made up of 3 main functions:
form( … )update( … )widget( … )
form( … ) displays the options form for the widget that will appear on the administration side. The text boxes, titles, etc… are all displayed by the form( … ) method.
update( … ) processes the widget options when the save button is clicked on the administration page. This function will also sanitize the input given before saving to the database.
Finally, widget( … ) displays the actual contents of the widget on the front-end of the website.
There are also two more functions we will be using in order to make everything work. First, there is the __construct() function. The constructor method adds the widget to our WordPress core. There is also the register_widget( … ) hook. This hook registers the widget with our theme and makes it show up on the back-end.
Getting Started
To get started, we need to open our theme’s (preferably you would be using a child theme to do this) functions.php file, and create our class. This will look like:
At this point, we can also add the code to hook our widget into our theme. This is pretty much done with the same technique as other hooks and actions. First we make a function that contains our register_widget( … ) code, and then we call that function with the add_action( … ) hook. The end result looks like:
I personally added this code above my class collaborator_widget extends WP_Widget code. It is also important to note that the call to register_widget( ‘collaborator_widget’ ) has the exact same name as the class (which will also have the same name as the Base ID in the constructor). If you decide to name you widget something else, please keep this in mind!
Constructor
Next up is our constructor function. In the constructor we need to create a base ID, name, and then fill out some arguments. The result looks like:
As you can see, we set the base ID to the same name as our class. As I mentioned above, the name of the base ID and the class must be the same. This same name is then what must be called by the register_widget( … ) function.
You can set the name and description for the widget to whatever you want, but be aware that they will both appear in the widget administration screen on the back-end of the site. If you want to make a widget for production, be sure to put some thought into make a descriptive name and a well worded description.
That’s all there is to the constructor! Next we will look at the back-end form and the form( … ) function.
The Back-End Form
Now that we have our constructor set up, we will switch attention to the back-end form. The reason we want to look at the back-end form next is because we can determine what variables we want to include in our widget. This means if you went in to develop a widget but didn’t have it perfectly planned out, if you followed the order of this tutorial, you won’t have to go back and add more code into other functions.
We use the form( $instance ) function call to generate our back-end form. The $instance variable that is passed in is the previously saved values from the database. The first thing we will want to do is check $instance to see if the values have already been set. If they have been set, then that’s good, we have a value for them. If they have not been set, then we will set a default blank value to them.
We will then display the HTML for our back end form. The function ends up looking like:
Note the use of PHP tags for displaying the HTML form. Rather than echo everything out, I opted to just use HTML and embed PHP. For the rest of the tutorial I will use echo statements, so as long as you get this section right you should be good to go.
Updating the Values
The update( $new_instance, $old_instance ) function is used to sanitize widget values from the form and then save them. Saving $instance to the database may seem like it would be quite a bit of work since most database operations are, but luckily WordPress handles a lot of the work for you. All you have to do is return $instance and it will be saved to the database by the WordPress core. All there is to do is update $instance to the new values contained in $new_instance. We can update the values and return $instance using the following code as our function:
As you can see, I use a ternary operator in order to quickly go through the fields and set the values of $instance. If you aren’t really sure how to use the ternary operator, please check out my tutorial on The Elvis Operator which covers it in depth along with some other cool tricks. Now that we have the update( … ) function covered, the last thing we have to look at is displaying our widget’s contents on the front-end.
Displaying on the Front-End
The final step to getting your own widget working is to use the widget( $args, $instance ) function to display our widget’s contents on the front-end of the site. The first step is to extract( $args ). It may appear that we don’t use anything from $args in our widget, but that is always the first step. Next we will get the values from $instance(again using a ternary operator, see The Elvis Operator for more details) and display them. The final function looks like:
And that’s it! You’ve created your own custom WordPress widget.
Putting It All Together
The final code that is added to functions.php is:
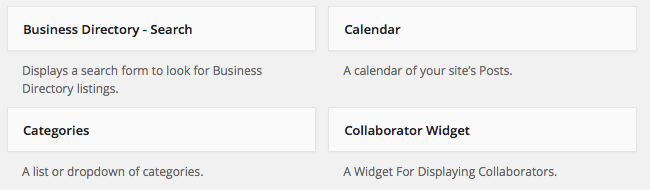
In the back-end you should see your Widget appear now:
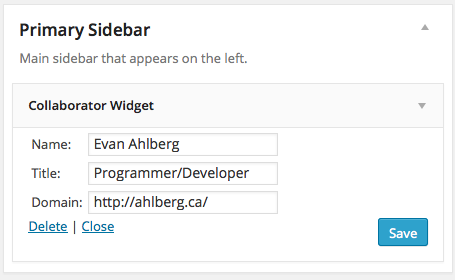
You can then drag it to a widget area, and fill out the information:
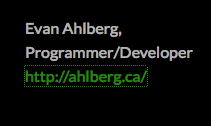
Finally you should be able to see the results of the widget on the front-end of the website:
Conclusion
This tutorial is best coupled with the tutorial from last week on Adding a Widget Area to WordPress you can create both your own widget area and your own widget to go in that area. This gives immense control over the kinds of customization you can do to your website using WordPress. If you want to learn more about making widgets, visit the WordPress Widgets API Codex for more information.
As always thank you for reading and please share it around as much as you can! Please feel free to put any suggestions or ideas for future tutorials in the comments section below. I haven’t planned what I want my next tutorial to be so any suggestions might become the next tutorial!