
One of the most highly requested features for modern websites is a column layout. Clients want to be able to display their content in 2, 3, 4, etc… columns. There has been a big resurgence in a “print-style” for websites recently, something that looks kind of like a newspaper. Honestly I have no idea where this comes from; maybe its because it fits well into flat design, maybe someone decided they are going to bring the newspaper look online and it simply caught on. Whatever the reason, columns are one of the new in things for developers.
This tutorial aims to show you some really well developed and simple column examples so we can all get in on the fun. All of these examples should work perfectly fine in a responsive design, and after we go over everything – I will quickly run down how to add these columns to a WordPress theme (go to Theme Forest if you want to see how common column shortcodes are in themes these days – pretty much all the big themes have them included). After all of that you should be able to go out and implement these wherever you see fit.
The CSS Properties
When working with columns in CSS3, there are built in properties we can use. These are column-count and column-width. As it turns out, you can use either of these and get the same effect, but your best bet is to use both. You can also do this with the shorthand columns. This functions somewhat similarly to how something like padding-left and padding-right can be combined using just padding.
Let’s take a look at what each individual property and seeing what they do before combining them using columns.
column-count
Let’s first take a look at the column-count property. This property describes the number of columns in our element. It is important to note that the column count will remain the same no matter how small the screen gets. This can lead to problems in responsive designs, but we will address how to correct this issue later. First, lets take a look of an example using the column-count property:
This will produce something that will look like this:

Now, if we reduce the size of this we get:
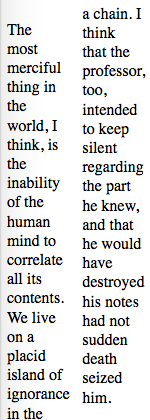
As you can see it maintains the two column layout even when the width becomes extremely small. If you want to read more about the column-count please read the Mozilla Developer Docs on it.
column-width
The column-width property is used to define the width of a column. However the value given is not the exact width of the column, but rather a minimum width. This value will tell the browser to produce as many columns of that width as possible, but if there is not enough room revert back to a single column. Let’s take a look at the example code:
This will produce a page that looks like:
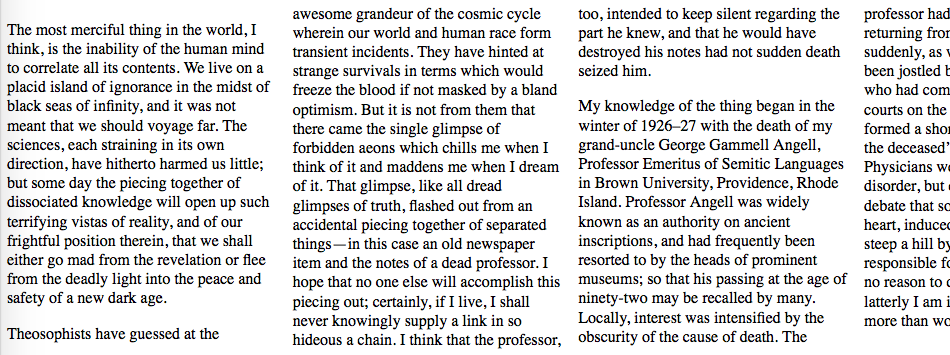
As you can see, since there was room for four columns of 250px four columns were dispalyed. However, when we make the page skinner than 250px we get something that looks like this:

The page has reduced down to one column instead of four since there is no longer room. This is the different between column-count and column-width. As you can see it maintains the two column layout even when the width becomes extremely small. If you want to read more about the column-width please read the Mozilla Developer Docs on it.
Two Column Example Using the columns Property
You can see the results in the CodePen below. If you’ve never used CodePen, all you need to know is that it’s a great way to test things out if you are only working with HTML, CSS and JavaScript. The best part is you can actually edit and mess around with the code that I’ve written by click on the “Edit on CodePen” in the top right hand corner of the display box. So feel free to play around with any of the examples in this tutorial. You can view the HTML and CSS by click on the appropriate tab on the top. There is also a JavaScript tab but there is no JavaScript for this example.
See the Pen Two Column Example by Alex Dobson (@SufferMyJoy) on CodePen.
If you go in and mess around with the size of the CodePen example above, you will notice that if you reduce the size of the page below 250px, it will revert to a single column layout. However, at full screen it will still only be two columns. This is how the columns property works. The first number is the number of columns, which we have designated to be 2. The second number is the width attribute, showing the minimum width before the columns will reduce.
Making a WordPress Column Shortcode
To convert our new CSS to a shortcode is extremely easy (if you don’t know anything about shortcodes check out my tutorial on Creating Your Own WordPress Shortcodes to learn the basics). All you have to do is have the CSS we went over above in your style sheet and then add the following code to your functions.php file:
As you can see in the code, I’ve only included a two column shortcode, but you can easily modify the CSS above to do 3, 4, etc… columns if you want. All you really need to do is change the first number (which as a reminder is the column-count number) and you will be good to go. You may also want to change the second number to be a bit small for larger column counts just so you don’t wind up with it always reducing the count.
You may have also noticed that the ending shortcode is generic. This is because this is how I would actually develop a shortcode like this. You don’t need a perfectly matching shortcode to end each one since it only requires an ending </article> tag. If you wanted you could of course create specific ending shortcodes – but this one is usable with any column count that you want to use.
My final note about the code above is that you don’t even necessarily have to create specific starting shortcodes. You could use a passed in attribute to determine the number of columns and then simply have a case statement for each of the CSS classes you created. It would probably look something like this:
Unfortunately I’ll have to cut this weeks tutorial short there. I was going to go over some other CSS properties that would effect our columns, but this week is a busy week at work so that will be next weeks tutorial. I will be going over column-gap (Mozilla Developer Doc), column-rule (Mozilla Developer Doc), column-span (Mozilla Developer Doc) and column-fill (Mozilla Developer Doc).
If you simply can’t wait the Mozilla Developer Docs on each are linked! But that will be next weeks tutorial.
As always thank you for reading and please share it around as much as you can! Please feel free to put any suggestions or ideas for future tutorials in the comments section below.