
All programmers know that debugging can be one of the most frustrating parts of any development cycle. Debugging can be extremely easy or extremely difficult – and a lot of that depends on the tools available to help the process along. Over the past few weeks, I decided to dedicate myself to learning more (not that I knew much before) about debugging and testing in WordPress. I was actually pretty guilty of not using all the tools available to me, and as a result I was not being as efficient as I could have. But now I have discovered a lot of built in WordPress debugging features, and they are all amazing so I thought I would share them with you – just in case anyone was in the same boat as I was.
WordPress comes with a specific debugging system built right into the core. This system is mainly comprised of constants that you can set, which will then give you more information. This is awesome because its super easy to go from development mode to production since all you need to do is switch the value of the constants. It’s also great because it requires no work, the WordPress core developers have already done all the work for you. The debugging options are also meant standardize code, which allows standardization across the core, themes, and plugins.
Before we take a look at the built in debugging features in WordPress, let’s take a look at a more DIY version using native PHP functions. I feel it’s important to cover these basic functions just in case the WordPress debugging tools don’t tell you what you need to know. After that I will cover the built in WordPress debugging constants and my favorite debugging plugin. Let’s get started!
Home Brewed Debugging
PHP comes with some pretty awesome functions for debugging built right in. If you understand these PHP functions you can get the exact information you want if WordPress doesn’t give it to you for any reason. On top of that, these functions are a good place to start a discussion about debugging, so that’s what we will do.
print_r( … )
The print_r( … ) function prints information about a variable in human readable form. This is especially useful when dealing with arrays. An example usage can be found below:
The output for this code (tested on Compile Online) would look like:

The print_r( … ) function can also be passed a second boolean parameter, which will then output the results of the print_r( … ). This can be used to save the results for whatever purpose you want. An example can be seen below:
This gives the same output as the first example given. However, you can use that variable for whatever you want – not just output. This gives print_r( … ) much more flexibility by saving the output as a variable. To learn more about the print_r( … ) function, please check out the PHP Manual page.
var_dump( … )
The var_dump( … ) function outputs a ton of information about a variable. It is somewhat similar to the print_r( … ) function but contains a lot more information about the variable. The information includes its type and value. Also note that all public, private and protected properties of objects will be returned in the output. An example var_dump( … ) is given below:
The output for this example (tested on Compile Online) would look like:

I personally use var_dump( … ) a lot in my debugging. Using it on things like the $_POST array makes things infinitely easier when testing things, and its nice to just see all the output at the top of the page. If you want to learn more about the var_dump( … ) function, please check out the PHP Manual page.
var_export( … )
There is also the very mighty PHP function var_export( … ). This function acts in pretty much the same way as var_dump( … ) but the string that is returned is valid PHP code. Also note that var_export( … ) can turn any object into an array. This means you can use it on classes as well. Let’s take a look at an example using the same array as in our var_dump( … ) example:
The output for this var_export( … ) call (tested on Compile Online) would look like:
![]()
As you can see – the output is valid syntax for a PHP array. This can be used for a variety of different things, but there are only a couple uses that really pertain to debugging. Firstly, its very useful that the output is given as valid PHP code because it will instantly be easy for coders to understand if something went wrong. You can also use this function to see all available methods of a class. As you can imagine, this function also has a lot of creative uses, but we won’t get into those here. For more information about the var_export( … ) function, please check out the PHP Manual page.
WordPress Built in Debugging
While the above techniques also work for WordPress, there are some built in tools in WordPress that help you to debug your code easily. Most of these features should always be turned on when you are working in your development environment. They will save you a ton of time and energy.
define(‘WP_DEBUG’, true)
The first of those tools is found in the wp-config.php file, the constant define(‘WP_DEBUG’, false) (notice the constant is false by default). If you set this constant to true you’ll start to see all PHP errors, notices and warnings – including notices about depreciated functions. Coupled with Xdebug (which will display all errors, notices and warnings a really nice format) you will be able to debug most of your problems just using this constant. Let’s take a look at a site that has define(‘WP_DEBUG’, true) defined:
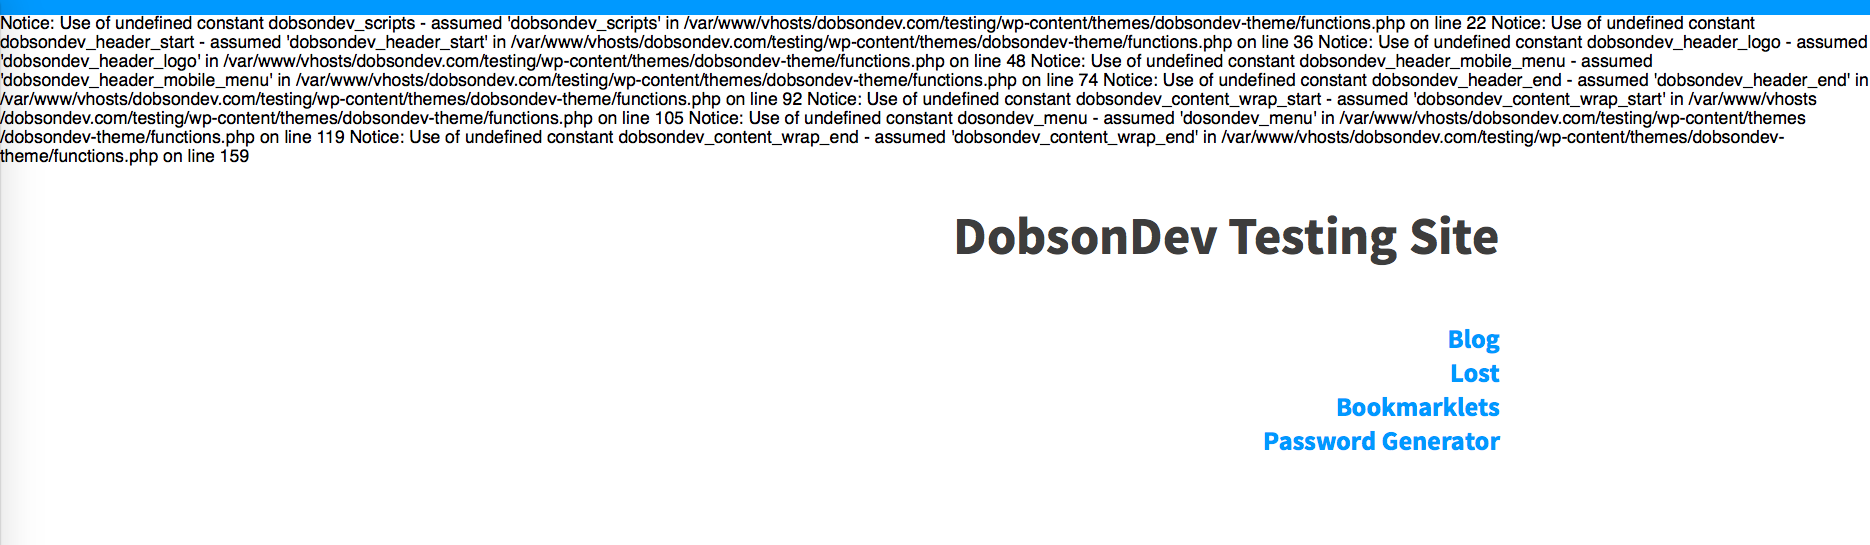
As you can see, we now see a bunch of information on the goings on in our site. You might notice that on my test site, we have a few notices related to an undefined constant (this is actually a well known error that has to do with using an older version of PHP on your server). You can see the notices that pop up and you will also see that they point to the exact line where the problem is coming from. We can then go in and fix whatever the problem is.
define(‘WP_DEBUG_LOG’, true)
The define(‘WP_DEBUG_LOG’, true) is a companion constant to the wp-config.php constant that allows you to (if you set the constant to true) save all the information displayed by wp-config.php into a file called debug.log. This is especially useful if you want to see notices that would be displayed off screen, such as in an AJAX call.
define(‘WP_DEBUG_DISPLAY’, true)
The define(‘WP_DEBUG_DISPLAY’, true) is another companion constant to the wp-config.php constant that allows you to control whether or not you want your errors, notices and warnings to display inside the HTML of your page or not. You can use define(‘WP_DEBUG_DISPLAY’, true) along with define(‘WP_DEBUG_LOG’, true) to make sure that errors are both saved to the debug.log file as well as displayed on the page.
define(‘SCRIPT_DEBUG’, true)
This constant will force WordPress to use development version of core CSS and JavaScript files rather than the minified versions that are normally loaded. This is especially useful when you want to try to make modifications to any built in CSS or JavaScript files. Note that the default value for this constant is false.
define(‘SAVEQUERIES’, true)
The built in WordPress $wpdb object is an amazing thing. I have definitely been guilty of not using this in the past, but now it is the only thing I use to do database operations. It makes everything easier, faster, and better! Another reason to use this handy feature is the define(‘SAVEQUERIES’, true) constant. When the constant defined as true causes each query to be saved, how long that query took to execute, and what function called it. This is all stored in the $wpdb->queries global. It is really important to note that this will have a performance impact on your site, so it should only be turned on when debugging.
Plugins to Help You Debug
One of the best tools you can use to help you debug are the great tools built by the community. There are many plugins created with the goal of helping debugging along. Some example plugins recommended by WordPress are Debug Bar with Debug Bar Console, Log Deprecated Notices and Total Security. My personal favorite is the Debug Bar plugin. It gives you a “Debug” option on your admin toolbar, which when clicked will show a lot of information about that page. It’s a great tool, especially for load times.
There are a load more plugins out there to help you debug, so try out a few and see what you like.
That’s all folks! That’s a very basic introduction to basic PHP debugging as well as debugging in WordPress. As mentioned at the start of this post, I have just started to look into WordPress debugging myself so there is still a lot to learn. I want to look a lot more into the other plugins available and other community made debugging tools that are out there. If you are looking to learn more check out the Codex page on debugging and even WordPress.tv (if you like video tutorials/discussions, this is the place for you) to get a start. From there you can find great information on debugging pretty much anywhere – every developer has to debug so its a very popular topic of discussion all over the place.
As always thank you for reading and please share it around as much as you can! Please feel free to put any suggestions or ideas for future tutorials in the comments section below.