
Before we get started I just want to get one thing out of the way. Ramen is really good. Like REALLY GOOD. That is if you make home made or get it from a good ramen shop. The ramen most people know about is instant ramen, which while also quite delicious (mainly because of insane amounts of salt and MSG) doesn’t hold a candle to home made.
What I will present to you here is a recipe for rotisserie chicken ramen. It’s adapted from a recipe By Peter Meehan that was published on Lucky Peach. I wasn’t actually going to take the time to write this all down since their recipe is amazing, but unfortunately Lucky Peach has since closed, so I feel the need to share this with everyone.
Ramen is quite an involved process. The recipe for this ramen is divided into three parts:
- Make the broth
- Make the noodles
- Assemble
I like the idea Peter came up with to use a rotisserie chicken just to save that little bit of time where you can. However, if you roasted your own chicken that would obviously also work. Let’s start by making the broth.
Rotisserie Chicken Broth
5 minute
2 hours
4
- 1 Rotisserie Chicken
- 4 Green Onion/Scallions
- 2 Garlic Cloves
- 1 Inch Ginger
- 3 Rashers Bacon
- 1 Dried Shittake Mushroom
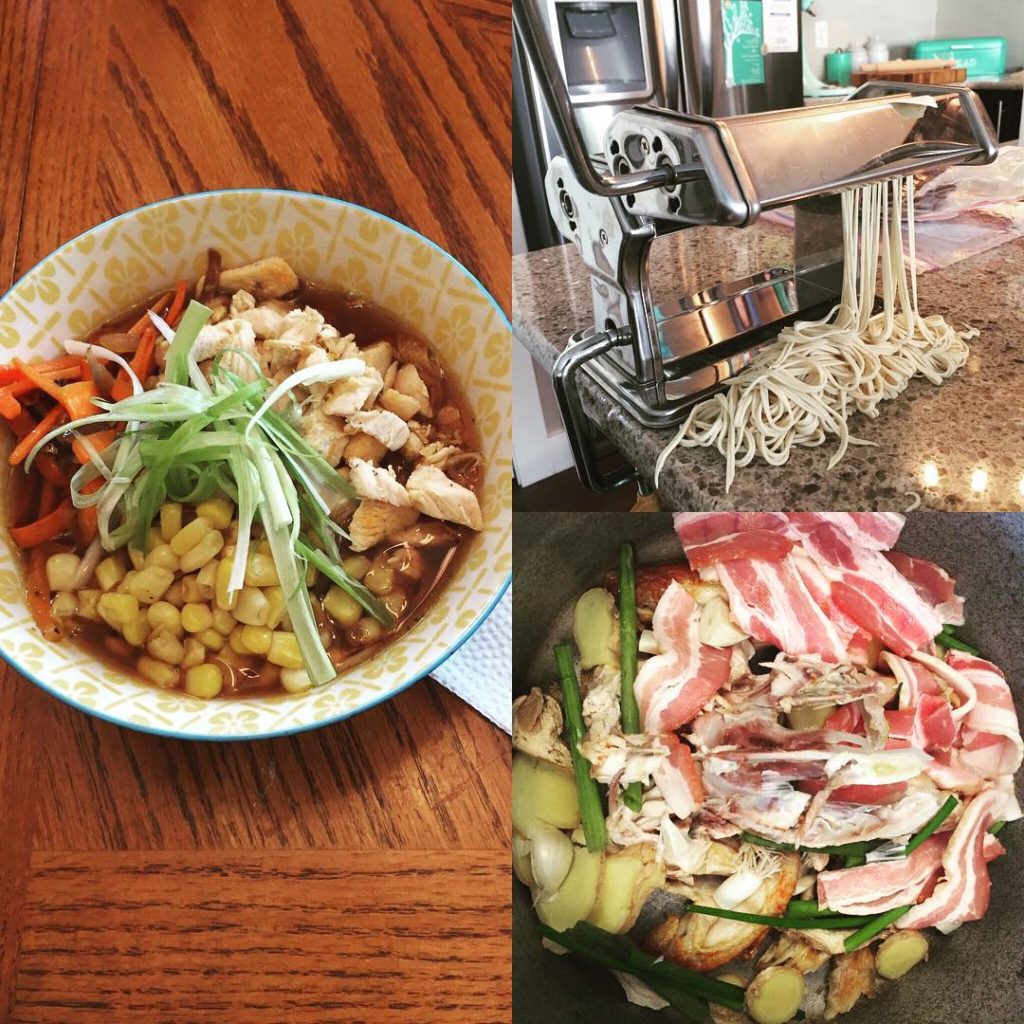
The first thing you want to do here is pick all the meat you can from your chicken. In this recipe I’m saying to use a rotisserie chicken from your local super market, but obviously if you roasted your own chicken it would only make the whole recipe that much better. Reserve all the picked meat for the finished ramen later on.
At this point you get to make a choice, you can roast the chicken bones for a deeper and more caramelized flavor. You can of course just skip this step, but I like to do it. Just throw the carcass of the chicken into a oven with the broiler on and watch it until everything is nicely browned. Then take it out and drain any excess fat.
Once you have the carcass roasted (or not!) throw everything into your stockpot. Here’s the prep you want to do to each ingredient before throwing it into the stock pot:
- Green onions slices into 1 inch pieces.
- Garlic cloves smashed.
- Ginger sliced into thin rounds.
- The bacon rashers (slices) can just be thrown in whole.
- Dried shittake sliced thin if your dried mushroom doesn’t already come sliced. If the mushrooms are sliced already try to estimate how many slices would make a whole mushroom.
Once you have all that in the pot, simply add the 12 cups of water and bring to a boil. At that point bring the temperature down on your stove and let the broth simmer. You want to simmer the broth for a total of 2 hours, but after 15 minutes of simmering you want to skim all the white scum off the top of the broth. This will produce a clearer and cleaner broth in the end.
After two hours strain your broth and you’re good to go! Let’s take a look at making the ramen noodles next since you can make them while your broth cooks.
Ramen Noodles
20 minutes + 45 minutes resting
2 hours
4
- 400g Bread Flour
- 160g water
- 4g kosher salt
- 8g baked soda
- optional orange food dye
Please note that this recipe is adapted from a user on Reddit named Ramen_Lord. For the love of all things holy, please visit Ramen_Lord on Reddit if you want to get recipes for amazing ramen. He is the King of ramen as far as I’m concerned and the best source of knowledge unless you want to learn Japanese and move to Japan to learn from a master there.
Okay, so I bet you read those ingredients and read “baking soda”, but look again and you’ll see “baked soda”. So now you may ask, what the heck is baked soda. Well it’s actually quite simple, it’s baking soda that you bake in an oven at 250 F. But why you may ask.
Ramen noodles have a high alkalinity. This gives them more chew which is the distinctive feature in ramen noodles as far as I’m concerned. If you want to know more, the method of using baked soda for ramen noodles was discovered by the amazing food scientist Harold McGee, and he talks all about it on NY Times. It’s a really interesting article and definitely worth the read.
The main point here is cook your baking soda in the oven at 250 F on a baking sheet, then put it all in a jar and use it as needed.
First things first, add the baked soda and salt to the water and stir to dissolve completely. At this point you can also add that food dye if you love those deeply yellow noodles. I didn’t it when I made them, so if you reference the picture at the bottom of this page.
Add your flour to either your stand mixer bowl or a regular bowl if you don’t have a stand mixer (you’re gonna get an arm workout later if you don’t have a stand mixer). Next, gradually add the water mixture to your flour. Pour along the outside rim of the bowl and mix the water in as you pour with a fork. Continue to mix the flour with the water using your fork until the ingredients look like a small crumbs. Please note that they should look moistened. Cover the bowl with a tea towel and let this crumble mixture rest for 5 to 15 minutes. This gives the flour time to fully absorb the water and alkaline salts.
Once the mixture is done resting you’ll want to start squishing the mixture with your hands until it comes together into one cohesive unit. If you need to, add water a teaspoon at a time to ensure the mixture is able to come together. Be happy at this point, because the worst part is about to come… kneading.
You’re going to have to knead this dough for a VERY long time. According to Ramen_Lord, “some people throw it into a plastic bag and step on it repeatedly, which simulates the kneading process used in restaurants”. If you have a stand mixer you’ll want to throw this in the stand mixer and just let it knead on medium for a long time, maybe 5 – 10 minutes. Don’t walk to far away from the stand mixer either, this dough is tough and your stand mixer might jump around a bit so make sure it doesn’t fall off the counter or something stupid like that… Now if you don’t have a stand mixer, throw this mixture onto a lightly floured surface and press it down with a rolling pin, then fold it on itself and repeat. I recommend using the rolling pin just because the dough is so tough. Either way, you’ll want to knead this dough until it becomes very smooth. If you’re doing this by hand or with the stand mixer, be patient and keep going until you have a smooth dough.
When you finally attain a smooth dough (congrats by the way!), ball up the dough, cover it in plastic wrap and put it into the fridge for at least 30 minutes. This gives the gluten time to relax. The dough might look quite dry at this point, but don’t worry about it, once the gluten rests everything will roll out and cut perfectly fine.
After at least 30 minutes pull your dough out of the fridge. Portion the dough into into 4 and roll out to the desired thickness using your pasta machine or rolling pin. I make my dough a little bit thicker than your average spaghetti. If you do have a pasta machine, make sure you run the dough through the thickest setting a few times just to ensure the thinner settings don’t have to struggle to badly.
Next cut your noodles out of the dough. This is infinitely easier with a pasta machine. If you don’t have one go really slowly with the sharpest and longest knife you can find. Maybe though, invest the $40 in a pasta maker?
Here’s a tip from Ramen_Lord:
To create “縮れ麺” or wavy noodles, dust your new noodles with flour and squeeze them between your hands, kind of like making a snowball. After a moment, shimmy them around to loosen them. Repeat this process a few times. This squeezing/detangling action creates a wavy, irregular texture, good for carrying soup and looking awesome.
You’re noodles are now ready to go! If you’re using them right away just set them aside. If you don’t want to use them right away, freeze them and take them out when you need them. They actually freeze quite well and you can cook them right from frozen if you really want to, just add an extra minute or so to the cook time.
Speaking of cooking these noodles, throw these into a pot of bowling water for 1 to 2 minutes. I really would recommend just taking out a noodle and tasting it to know if it’s the right doneness for you. Remember too that you’ll be throwing these into hot soup to serve so err on the side of al dente.
Finally we are going to look at assembly and putting this dish together.
Assembling Your Ramen
5 minutes
None
4
- 1 Batch Ramen Noodles Cooked
- 1 Batch Rotisserie Chicken Broth
- 1 Rotisserie Chicken Meat Picked
- Green Onion
- Carrot
- Corn
- Soft Boiled Egg
- 2 pieces dried kombu
- 1/2 cup reduced-sodium soy sauce
- 2 tablespoons dry sake
- 1 tablespoon mirin
This is the easy part:
- Put 2 tablespoons tare in the bowl.
But wait?! I didn’t go over making tare. Honestly, tare requires some specialty ingredients. If you want to make it, look up a recipe from the mighty Ramen_Lord and more props to you. However, I will also show you a cheat for this recipe since we’re already cheating on the chicken. To make a cheat tare, I like to add 6 tablespoons of reduce sodium soy sauce, 2 tablespoons mirin, 1 tsp brown sugar, and 1 dried stock cube of your choice. I know it sounds weird, but basically tare is supposed to be a big flavor punch and the dried stock cube really gives it some punch in that way. All those measurements will give you about 4 servings of the tare.
Then we can proceed with the rest:
- Put 3 cups broth in the bowl.
- Add one quarter cooked noodles.
- Add some picked chicken meat.
- Add toppings! All of these are optional, but I like to top mine with julienne carrots, some corn, a soft boiled egg, and julienne green onions that are put in an ice bath for about a minute to make them curl up. But add whatever you want.
That’s it! Enjoy your ramen and be proud that you’ve made one of the tastiest foods possible all by yourself. If this recipe gets you hooked on ramen then go visit Ramen_Lord on Reddit for more recipes and way more information. Ramen is a surprisingly huge topic of research, there are a lot of different types of ramen out there and even more techniques.
As always thank you for reading and if you try out this recipe let me know how it goes in the comments below. Please also let me know any recipes, cuisines or techniques you want to know more about and I’ll try my best to either share something I’ve already done or find something new.